How To Safely Access Your Raspberry Pi From The Internet
Imagine this: You've set up your Raspberry Pi as a tiny powerhouse for home automation, media streaming, or even a personal web server. But what if you could control it from anywhere in the world? Accessing Raspberry Pi from the internet sounds like a dream, right? Well, it’s totally doable, but you gotta be smart about it. Security is key, my friend, and that’s exactly what we’re gonna break down in this guide.
Now, before we dive deep into the nitty-gritty, let’s talk about why accessing your Raspberry Pi from the internet is such a big deal. Think about it—your little Pi can become your personal assistant, running scripts, controlling IoT devices, or hosting files. But if you’re not at home, you won’t be able to access it unless you configure it properly for remote access. And trust me, doing it wrong can leave your system vulnerable to hackers.
In this guide, we’ll walk you through everything you need to know. From setting up secure connections to troubleshooting common issues, we’ve got you covered. So grab a coffee, sit back, and let’s make your Raspberry Pi accessible from anywhere on the planet—safely!
Read also:Honeytoon Teach Me First Full Your Ultimate Guide To Learning With Fun
Table of Contents
- Why Accessing Raspberry Pi from the Internet is Important
- Preparing Your Raspberry Pi for Remote Access
- Securing Your Internet Connection
- Using SSH for Secure Access
- Understanding Port Forwarding
- Setting Up Dynamic DNS
- Alternative Methods for Remote Access
- Common Issues and How to Fix Them
- Best Practices for Safe Remote Access
- Wrapping It All Up
Why Accessing Raspberry Pi from the Internet is Important
Let’s face it—technology’s all about convenience these days. If you’ve invested in a Raspberry Pi for home automation, media streaming, or even as a personal web server, being able to access it remotely opens up a whole new world of possibilities. Imagine controlling your smart home devices from your phone while you’re at work or checking the status of a script running on your Pi while you’re out of town. Sounds pretty cool, huh?
But here’s the catch: not all remote access methods are created equal. Some are super easy to set up but come with major security risks. Others require a bit more effort but offer rock-solid protection for your system. In this guide, we’ll focus on the latter—because let’s be honest, nobody wants to wake up one day and find out their Pi’s been hacked.
Accessing Raspberry Pi from the internet isn’t just about convenience; it’s about giving yourself the freedom to manage your projects from anywhere, anytime. Whether you’re troubleshooting a script, checking logs, or controlling IoT devices, remote access makes life a whole lot easier. Just remember—security should always be your top priority.
Preparing Your Raspberry Pi for Remote Access
Basic Setup Requirements
Before you can start accessing your Raspberry Pi from the internet, you need to make sure it’s properly set up. Here’s a quick checklist to get you started:
- Install Raspbian OS: This is the official operating system for Raspberry Pi and comes with all the tools you need to get started.
- Enable SSH: SSH (Secure Shell) is the most common method for accessing Raspberry Pi remotely. You can enable it through the Raspberry Pi Configuration tool or by adding an empty file named “ssh” to the boot partition.
- Set a Static IP Address: A static IP ensures that your Pi always has the same address on your local network, making it easier to connect to.
- Update Your System: Always keep your Pi’s software up to date to ensure you have the latest security patches.
Once you’ve taken care of these basics, you’re ready to move on to the next step.
Read also:Sotwe Wasmo Ahmed The Rising Star In Digital Media
Securing Your Internet Connection
Why Security Matters
Let’s talk about the elephant in the room—security. When you expose your Raspberry Pi to the internet, you’re essentially opening a door to the outside world. And if you’re not careful, that door can be walked through by unwanted guests. Hackers are always on the lookout for vulnerable systems, and an improperly secured Raspberry Pi is a goldmine for them.
So how do you protect your Pi? Here are a few tips:
- Use Strong Passwords: Avoid using common passwords like “password” or “123456.” Instead, go for something complex with a mix of letters, numbers, and symbols.
- Enable Two-Factor Authentication (2FA): This adds an extra layer of security by requiring a second form of verification, such as a code sent to your phone.
- Limit SSH Access: Restrict SSH access to specific IP addresses or use a firewall to block unauthorized connections.
Remember, security isn’t just a one-time thing—it’s an ongoing process. Regularly update your software, monitor your system for suspicious activity, and stay informed about the latest security threats.
Using SSH for Secure Access
What is SSH?
SSH, or Secure Shell, is a network protocol that allows you to securely connect to your Raspberry Pi from another device. It encrypts all data transmitted between your Pi and the client device, ensuring that even if someone intercepts the connection, they won’t be able to make sense of the information.
Here’s how you can use SSH to access your Raspberry Pi:
- Enable SSH on Your Pi: As mentioned earlier, you can enable SSH through the Raspberry Pi Configuration tool or by adding an empty “ssh” file to the boot partition.
- Find Your Pi’s IP Address: You’ll need this to connect to your Pi. You can find it by running the command “ifconfig” in the terminal.
- Connect from Another Device: Use an SSH client like PuTTY (for Windows) or the built-in terminal (for macOS and Linux). Enter your Pi’s IP address, username (usually “pi”), and password when prompted.
SSH is a powerful tool, but it’s only as secure as the measures you take to protect it. Always use strong passwords, enable 2FA, and limit access to trusted devices.
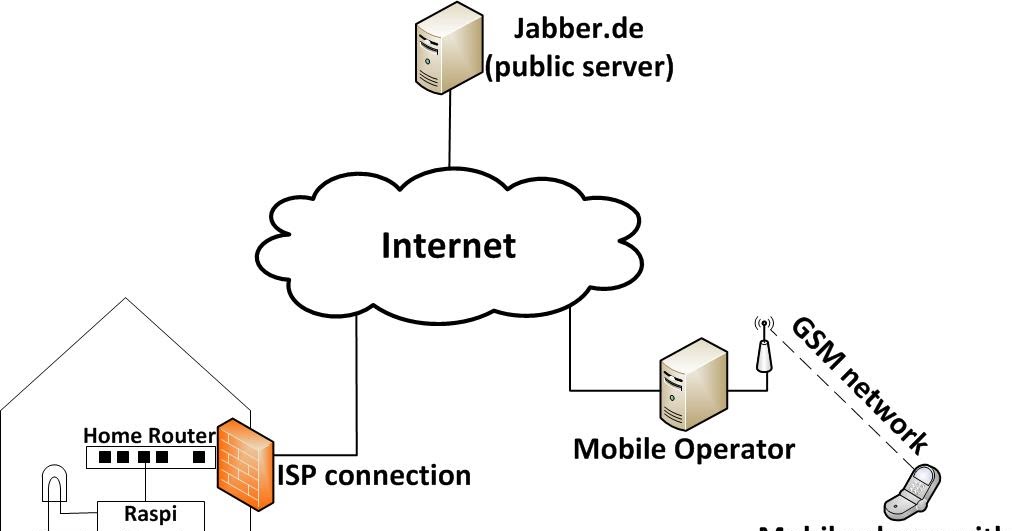
Understanding Port Forwarding
What is Port Forwarding?
Port forwarding is a technique that allows you to direct incoming traffic from the internet to a specific device on your local network—in this case, your Raspberry Pi. It’s like setting up a direct line of communication between your Pi and the outside world.
Here’s how you can set up port forwarding:
- Log in to Your Router: Access your router’s admin interface by entering its IP address in a web browser. The default IP is usually something like “192.168.0.1” or “192.168.1.1.”
- Find the Port Forwarding Section: This might be labeled as “Port Forwarding,” “Virtual Servers,” or something similar. Check your router’s manual if you’re not sure.
- Set Up a Rule: Create a new rule that forwards traffic on port 22 (the default SSH port) to your Pi’s local IP address.
Port forwarding can be a bit tricky, especially if you’re not familiar with networking concepts. If you’re having trouble, don’t hesitate to consult your router’s manual or reach out to your internet service provider for assistance.
Setting Up Dynamic DNS
What is Dynamic DNS?
Dynamic DNS (DDNS) is a service that maps your router’s public IP address to a domain name. This is especially useful if your ISP assigns you a dynamic IP address, which changes periodically. Without DDNS, you’d have to manually update your IP address every time it changes, which can be a real pain.
Here’s how you can set up DDNS:
- Choose a DDNS Provider: There are plenty of free and paid DDNS services out there. Some popular options include No-IP, DuckDNS, and Dynu.
- Create an Account: Sign up for an account with your chosen provider and create a domain name for your Pi.
- Configure Your Router: Most modern routers have built-in support for DDNS. Log in to your router’s admin interface and enter your DDNS provider’s details.
With DDNS set up, you’ll always be able to access your Raspberry Pi using a domain name, even if your public IP address changes. It’s a small but important step in making your Pi accessible from the internet.
Alternative Methods for Remote Access
Exploring Other Options
SSH and port forwarding are great, but they’re not the only ways to access your Raspberry Pi from the internet. Here are a few alternative methods you might want to consider:
- VNC (Virtual Network Computing): VNC allows you to remotely control your Pi’s graphical interface. It’s perfect if you prefer working with a GUI instead of the command line.
- TeamViewer: TeamViewer is a popular remote access tool that works on a variety of platforms. It’s easy to set up and doesn’t require port forwarding or DDNS.
- Weaved: Weaved is a cloud-based service that allows you to access your Pi from anywhere without the need for port forwarding or DDNS. It’s a great option if you want a hassle-free setup.
Each method has its own pros and cons, so it’s worth experimenting with a few to see which one works best for you.
Common Issues and How to Fix Them
Dealing with Connection Problems
Even with the best-laid plans, things can sometimes go wrong. Here are a few common issues you might encounter when accessing your Raspberry Pi from the internet and how to fix them:
- Can’t Connect via SSH: Double-check your Pi’s IP address, ensure SSH is enabled, and verify that port forwarding is set up correctly.
- Dynamic DNS Not Working: Make sure your router is properly configured and that your DDNS provider’s details are correct. Also, check if your public IP address has changed.
- Security Alerts: If you notice any suspicious activity, change your passwords immediately and review your security settings.
Troubleshooting can be frustrating, but with a bit of patience and perseverance, you’ll be back up and running in no time.
Best Practices for Safe Remote Access
Staying Secure
Now that you know how to access your Raspberry Pi from the internet, let’s talk about some best practices to keep your system safe:
- Regularly Update Your System: Keep your Pi’s software up to date to protect against known vulnerabilities.
- Use a Firewall: A firewall can help block unauthorized access and protect your system from attacks.
- Monitor Your System: Keep an eye on your Pi’s activity logs to detect any suspicious behavior early on.
Security is all about being proactive. By following these best practices, you’ll greatly reduce the risk of your Raspberry Pi being compromised.
Wrapping It All Up
Accessing Raspberry Pi from the internet is a powerful feature that opens up a world of possibilities. From controlling smart home devices to managing remote servers, the applications are endless. But with great power comes great responsibility, and that’s why security should always be your top priority.
In this guide, we’ve covered everything you need to know to safely access your Raspberry Pi from the internet. From setting up SSH and port forwarding to exploring alternative methods and best practices, we’ve got you covered. So what are you waiting for? Go ahead and give it a try!
And hey,

