Raspberry Pi Not Accepting SSH Password: The Ultimate Troubleshooting Guide
Ever tried to SSH into your Raspberry Pi and got stuck because it won’t accept your password? Frustrating, right? Well, you’re not alone. This issue is more common than you think, and today we’re going to dive deep into why this happens and how to fix it. If you’re here, chances are you’ve already spent hours scratching your head wondering what went wrong. Let’s break it down step by step so you can get back to hacking away on your projects.
SSH is one of the most powerful tools for remotely managing your Raspberry Pi. But when it stops cooperating, it can feel like your entire setup is broken. The good news? Most of the time, the issue isn’t with your Raspberry Pi itself—it’s usually a simple configuration or connection problem. By the end of this guide, you’ll have all the answers you need to troubleshoot and resolve the "raspberry pi not accepting ssh password" issue once and for all.
Before we dive into the nitty-gritty, let’s quickly cover what SSH is and why it’s so important for Raspberry Pi users. SSH stands for Secure Shell, and it allows you to securely connect to your Raspberry Pi from another computer. Whether you’re running a headless setup or just want to manage your Pi remotely, SSH is your best friend. But what happens when it stops working? That’s exactly what we’re about to find out.
Read also:Wasmo Telegram Link 2025 Download Free Ios Your Ultimate Guide
Understanding the Core Problem: Why Is My Raspberry Pi Not Accepting SSH Password?
When you encounter the "raspberry pi not accepting ssh password" issue, there are several potential culprits at play. The first step is to identify whether the problem lies with your Raspberry Pi, your SSH client, or your network setup. Let’s take a closer look at some of the most common reasons:
- Incorrect Password: It might sound obvious, but double-checking your password is always the first step. Typos happen, and even a single wrong character can lock you out.
- SSH Service Not Running: If the SSH service isn’t active on your Raspberry Pi, you won’t be able to connect no matter what you do.
- Firewall or Network Issues: Firewalls or misconfigured network settings can block SSH connections without you even realizing it.
- SSH Configuration Errors: A misconfigured SSH server can prevent authentication from working properly.
- Corrupted SSH Keys: If you’re using key-based authentication, corrupted or mismatched keys can cause connection issues.
Now that we’ve outlined the main suspects, let’s move on to some practical troubleshooting steps. Each of these potential problems has a solution, and we’ll cover them all in detail.
Step-by-Step Troubleshooting for Raspberry Pi SSH Issues
Troubleshooting can feel overwhelming, but breaking it down into manageable steps makes the process much easier. Here’s a checklist to help you systematically identify and resolve the "raspberry pi not accepting ssh password" issue:
1. Verify Your Password
This might seem basic, but trust us—it’s worth double-checking. If you’re using the default "pi" user account, the default password is "raspberry." If you’ve changed it, make sure you’re entering the correct one. Here’s how you can reset your password if needed:
- Log in to your Raspberry Pi via the desktop interface or a physical keyboard and monitor.
- Open a terminal and type `sudo passwd pi` to change the password for the "pi" user.
- Follow the prompts to set a new password.
Remember, passwords are case-sensitive, so pay attention to capitalization!
2. Ensure SSH is Enabled
By default, SSH is disabled on newer versions of Raspberry Pi OS. To enable it:
Read also:Nagi Hikaru Nsfw The Controversy The Facts And The Truth Behind The Buzz
- Boot your Raspberry Pi and log in.
- Open the terminal and type `sudo raspi-config`.
- Navigate to "Interfacing Options" and select "SSH."
- Choose "Yes" to enable SSH and then reboot your Pi.
You can also enable SSH by placing an empty file named "ssh" (without an extension) on the boot partition of your SD card before booting your Pi.
3. Check Your Network Configuration
Network issues can prevent SSH connections from working. Here’s how to verify your network settings:
- Ensure your Raspberry Pi is connected to the same network as your client device.
- Check your Pi’s IP address by typing `hostname -I` in the terminal.
- Use tools like `ping` to test connectivity between your client and the Pi.
If you’re still having trouble, try switching to a different network or using a wired Ethernet connection instead of Wi-Fi.
Advanced Troubleshooting Techniques
For more complex issues, you may need to dig deeper into your Raspberry Pi’s configuration. Here are some advanced troubleshooting tips:
1. Inspect SSH Logs
Your Raspberry Pi keeps detailed logs of SSH activity, which can help you diagnose connection issues. To view these logs:
- Open a terminal on your Raspberry Pi.
- Type `sudo journalctl -u ssh` to view the SSH service logs.
- Look for any error messages or warnings that might indicate the problem.
Common issues you might encounter include failed authentication attempts, connection timeouts, or configuration errors.
2. Test with a Different SSH Client
Sometimes the issue isn’t with your Raspberry Pi—it’s with your SSH client. Try using a different client to rule out software conflicts. Popular SSH clients include:
- PuTTY (Windows)
- Terminal (Mac)
- Mobaxterm (Cross-platform)
If one client works while another doesn’t, the problem is likely with the client configuration.
3. Reinstall the SSH Server
In rare cases, the SSH server itself may be corrupted. Reinstalling it can resolve these issues:
- Open a terminal on your Raspberry Pi.
- Type `sudo apt update` to refresh your package list.
- Then type `sudo apt install --reinstall openssh-server` to reinstall the SSH server.
- Reboot your Pi and try connecting again.
This process will restore the default SSH configuration and may fix any underlying issues.
Common Mistakes to Avoid
Even experienced users make mistakes when troubleshooting SSH issues. Here are a few common pitfalls to watch out for:
- Forgetting to Enable SSH: Always double-check that SSH is enabled on your Raspberry Pi.
- Using the Wrong IP Address: Make sure you’re connecting to the correct IP address for your Pi.
- Ignoring Log Files: Logs can provide valuable insights into what’s going wrong, so don’t skip this step.
- Overcomplicating the Problem: Start with the simplest solutions first and work your way up to more advanced troubleshooting.
By avoiding these common mistakes, you’ll save yourself a lot of frustration and time.
Best Practices for Secure SSH Connections
Once you’ve resolved the "raspberry pi not accepting ssh password" issue, it’s important to ensure your SSH setup is secure. Here are some best practices to follow:
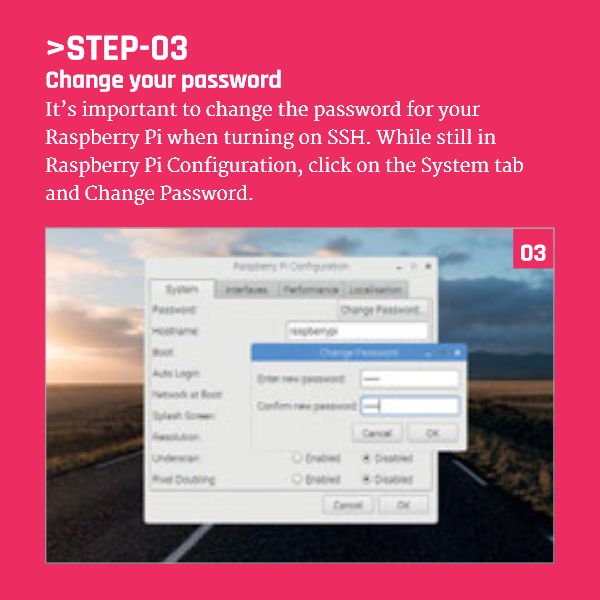
1. Change the Default Password
The default "pi" user password is well-known, so it’s crucial to change it as soon as possible. Use a strong, unique password that includes a mix of letters, numbers, and symbols.
2. Disable Password Authentication
For added security, consider switching to key-based authentication. This eliminates the risk of brute-force attacks and makes your SSH connections much more secure.
3. Update Your Raspberry Pi Regularly
Keeping your system up to date ensures you have the latest security patches and bug fixes. Use `sudo apt update` and `sudo apt upgrade` regularly to keep everything current.
Conclusion: Taking Control of Your Raspberry Pi SSH Setup
The "raspberry pi not accepting ssh password" issue doesn’t have to be a roadblock in your projects. With the right troubleshooting steps and a bit of patience, you can identify and resolve the problem quickly. Remember to always start with the basics—verify your password, ensure SSH is enabled, and check your network configuration. If the issue persists, don’t hesitate to dig deeper into logs or try advanced troubleshooting techniques.
As you continue working with your Raspberry Pi, keep security in mind. Implementing best practices like changing default passwords and using key-based authentication will protect your device from potential threats. And if you ever run into issues again, this guide will be here to help you troubleshoot.
Now that you’ve got all the tools you need to fix SSH problems on your Raspberry Pi, it’s time to put them into practice. Share this article with your fellow Raspberry Pi enthusiasts, leave a comment below if you have any questions, and don’t forget to check out our other guides for more tips and tricks!
Table of Contents
- Understanding the Core Problem
- Step-by-Step Troubleshooting
- Verify Your Password
- Ensure SSH is Enabled
- Check Your Network Configuration
- Advanced Troubleshooting Techniques
- Inspect SSH Logs
- Test with a Different SSH Client
- Reinstall the SSH Server
- Common Mistakes to Avoid
- Best Practices for Secure SSH Connections


